Another week, another tutorial in our Kubernetes operators series! After publishing our tutorials on Microsoft Azure and Google Cloud Platform, today we present you our guide on setting up a Kubernetes MySQL Operator Cluster on Amazon Web Services using kops.
Little by little, we will walk you through all the phases of starting your Kubernetes, installing all the tools by using simple command lines, as well as basic configuration capabilities, how to correctly perform backups and finally watching your cluster in action. Let’s get things started!
For this tutorial, we’ll use kops.
We begin with installing kubectl. New to kubectl? Visit: Install kubectl.
Next, install kops and run the following commands:
$ wget https://github.com/kubernetes/kops/releases/download/1.10.0/kops-linux-amd64

$ chmod +x kops-linux-amd64

$ mv kops-linux-amd64 /usr/local/bin/kops
Here’s where the fun begins! Create a route53 domain for your cluster:
$ aws route53 create-hosted-zone --name aws.presslabs.net --caller-reference 1Create an S3 bucket to store your cluster state
$ aws s3 mb s3://clusters.aws.presslabs.netPut the following lie in your bash profile ~/.basrc:
export KOPS_STATE_STORE=s3://clusters.aws.presslabs.netCreate your cluster configuration:
$ kops create cluster --zones=us-east-1c useast1.dev.example.comYou can edit your cluster with the following command:
$ kops edit cluster useast1.aws.presslabs.netEdit your node instance group:
$ kops edit ig --name=useast1.aws.presslabs.net nodesEdit your master instance group:
$ kops edit ig --name=useast1.aws.presslabs.net nodes master-us-east-1cCreate your cluster in AWS:
$ kops update cluster useast1.dev.example.com --yesValidate the cluster to ensure the master and nodes have launched:
$ kops validate cluster
Using cluster from kubectl context: useast1.aws.presslabs.net

Validating cluster useast1.aws.presslabs.net

INSTANCE GROUPS
NAME			ROLE	MACHINETYPE	MIN	MAX	SUBNETS
master-us-east-1c	Master	t2.medium	1	1	us-east-1c
nodes			Node	t2.small	2	2	us-east-1c

NODE STATUS
NAME				ROLE	READY
ip-172-20-42-187.ec2.internal	node	True
ip-172-20-43-129.ec2.internal	master	True
ip-172-20-54-0.ec2.internal	node	True
Your cluster useast1.aws.presslabs.net is ready

Install helm. New to helm? Check Install Helm.
To deploy this controller, use the provided helm chart by running:
$ kubectl create serviceaccount -n kube-system tiller

serviceaccount "tiller" created

$ kubectl create clusterrolebinding tiller-crule --clusterrole=cluster-admin --serviceaccount=kube-system:tiller

clusterrolebinding.rbac.authorization.k8s.io "tiller-crule" created

$ helm init --service-account tiller --wait

$HELM_HOME has been configured at /home/presslabs/.helm.
Tiller (the Helm server-side component) has been installed into your Kubernetes Cluster.
Please note: by default, Tiller is deployed with an insecure 'allow unauthenticated users' policy.
For more information on securing your installation see: https://docs.helm.sh/using_helm/#securing-your-helm-installation
Happy Helming!

$ helm repo add presslabs https://presslabs.github.io/charts

"presslabs" has been added to your repositories

$ helm install presslabs/mysql-operator --name mysql-operator

NAME:   mysql-operator
LAST DEPLOYED: Tue Aug 14 15:50:42 2018
NAMESPACE: default
STATUS: DEPLOYED
...
For more information about chart values see go to README. This chart will deploy the controller along with an orchestrator cluster.
Before creating a cluster, you need a secret that contains the ROOT_PASSWORD key. An example for this secret can be found at examples/example-cluster-secret.yaml.
Create a file named example-cluster-secret.yaml and copy into it the following YAML code
apiVersion: v1
kind: Secret
metadata:
  name: my-secret
type: Opaque
data:
  # root password is required to be specified
  ROOT_PASSWORD: bm90LXNvLXNlY3VyZQ==
Now, to create a cluster you need just a simple YAML file that defines it (an example can be found at examples/example-cluster.yaml).
Create a file named example-cluster.yaml and copy into it the following YAML code:
apiVersion: mysql.presslabs.org/v1alpha1
kind: MysqlCluster
metadata:
  name: my-cluster
spec:
  replicas: 2
  secretName: my-secret
For a more in-depth configuration, check these examples.
Deploying a cluster:
$ kubectl apply -f example-cluster-secret.yaml

secret "my-secret" created

$ kubectl apply -f example-cluster.yaml

mysqlcluster.mysql.presslabs.org "my-cluster"  created
To list the deployed clusters, use:
$ kubectl get mysql
NAME		AGE
my-cluster	1m
To check cluster state, use:
$ kubectl describe mysql my-cluster...
Status:
Ready Nodes: 1
Conditions:
Last Transition Time: 2018-08-16T11:28:14Z
Message: Cluster is not ready.
Reason: statefulset not ready
Status: False
Type: Ready
...
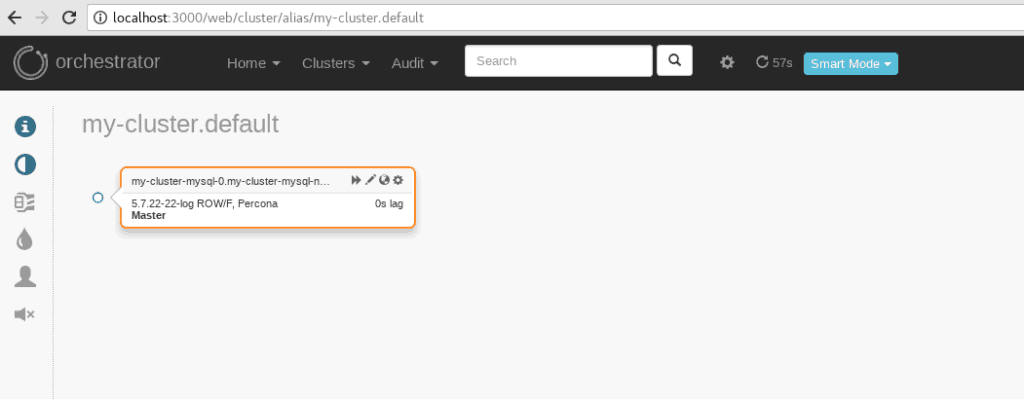
To connect to the orchestrator dashboard you have to port forward orchestrator port 3000 to your local machine by using:
$ kubectl port-forward mysql-operator-orchestrator-0 3000

Forwarding from 127.0.0.1:3000 -> 3000
Forwarding from [::1]:3000 -> 3000
Write
localhost:3000in a browser.
Backups
You need to have a secret. Create a file named example-backup-secret.yaml and copy into it the following YAML code:
apiVersion: v1
kind: Secret
metadata:
  name: my-cluster-backup-secret
type: Opaque
data:
  GCS_SERVICE_ACCOUNT_JSON_KEY: #
  GCS_PROJECT_ID: #
You need to complete the GCS_SERVICE_ACCOUNT_JSON_KEY field with the key you just downloaded. You also need to complete the GCS_PROJECT_ID field with your project’s name.
Note GCS_SERVICE_ACCOUNT_JSON_KEY and GCS_PROJECT_ID must be base64 encoded.
Then run this command:
$ kubectl apply -f example-backup-secret.yaml

secret "my-cluster-backup-secret" created
Backups are stored on object storage services like S3 or Google Cloud storage. In order to be able to store backups, the secret defined under backupBucketSecretName must use credentials to store those backups.
Setup your backups to Google Cloud. You need to have a storage bucket. For more information, learn how to create a storage bucket.
Requesting a backup is easy. You just need to create a file named example-backup.yaml and copy into it the following YAML code:
apiVersion: mysql.presslabs.org/v1alpha1
kind: MysqlBackup
metadata:
  name: my-cluster-backup
spec:
  clusterName: my-cluster
Run the following command:
$ kubectl apply -f example-backup.yaml

mysqlbackup.mysql.presslabs.org "my-cluster-backup" created
You need to specify the backupBucketUri for the corresponding cluster to an URI like gs://BUCKET_NAME and backupSecretName.
Open the file named example-cluster.yaml and copy into it the following YAML code:
apiVersion: mysql.presslabs.org/v1alpha1
kind: MysqlCluster
metadata:
  name: my-cluster
spec:
  replicas: 2
  secretName: my-secret
  backupSecretName: my-cluster-backup-secret
  backupUri: gs://pl-test-mysql-operator/
Then run the following command:
$ kubectl apply -f example-cluster.yaml

mysqlcluster.mysql.presslabs.org "my-cluster" configured
To list all backups, use the
$ kubectl getcommand to return a list of the backups.
$ kubectl get mysqlbackup

NAME                AGE
my-cluster-backup   55s
To check the backup state, use
$ kubectl describecommand:
$ kubectl describe mysql my-cluster...
Status:
Backup Uri: gs://pl-test-mysql-operator/
Completed: false
Conditions:
Last Transition Time: 2018-08-17T08:08:31Z
Message: First initialization of backup
Reason: set defaults
Status: Unknown
Type: Complete
...For more information see Installing Kubernetes on AWS with kops.
