
Linux and its countless flavors have been a staple of the computing community for decades. It isn’t as prevalent as it used to be, but many open-source devices, as well as web servers still use it as their core operating system on a daily basis.
As modern OS software like Windows and Mac OS became more prominent, the average user lost touch with Linux. This has led to an awkward skill-divide in the community, causing certain bits of knowledge to remain confined to Linux circles. Many are unfamiliar with the command line and may cringe at the thought of a GUI-less interface, yet they still bump into the occasional Linux term or two when uploading files or managing their web server.
We try to help our customers find their way around our platform through a series of tutorials using both command lines and GUI interfaces.
One such subset of “lost” knowledge is the Linux file system permissions. These show up in Linux environments as well as FTP programs with full graphical interfaces, and they make about as much sense to most users as ancient Egyptian hieroglyphs. Below we take a closer look at how to decipher Linux file system permissions the easy way.
#About Linux File System Permissions
Simply put, Linux file system permissions make it possible for a system administrator to allow or deny certain types of access to both files and directories. If an admin wants individuals or groups of users to only be able to open a file, without saving changes, they can make it happen with a quick command. This adds a great deal of security to any Linux system, though it can be unintelligible to the common user the first time they encounter it. Check our specifications regarding file structure and security for a better understanding of the importance of allowing or denying certain types of access.

Linux file system permissions are based on the old UNIX model, one of the older methods of managing files in the computing world. They take the form of single letters preceded by a dash, looking something like the following when they’re on their own:
-u
-r
-x
Grouped together, a more complicated Linux file system permission might take this form:
-rw-r-r-
There are multiple letters that might appear in a file’s permissions section. Simply stated, though, there are two broad categories to consider. The first are abbreviations for user permissions:
- ‘u’ stands for owner
- ‘g’ stands for group
- ‘o’ or ‘a’ stands for all users
And the second category is for access permissions:
- ‘r’ stands for read (“open”)
- ‘x’ stands for execute (“run” or “launch”)
- ‘w’ stands for write (“save”)
For a standard file, read permission allows a user to view the contents of the file, the equivalent of simply opening it on a Windows or Mac device. For a directory, read permission allows a user to simply view the names of the file in the directory.
Similarly, the write permission lets a user modify or delete a standard file. If it’s a directory, users can delete or modify the directory (create, delete, and rename files inside), or modify the contents of the file that other users can read.
Execute for normal files allows a user to open program files and scripts, just like launching an installer or a program. If it’s set for a directory, the user can access all metadata about files in that directory as well as enter the folder freely.
All file and folder access control is defined using the above information. Depending on which flag you see, you’ll know what can be done with a particular file, and who can do it. These permissions are set by the administrator and can only be changed by someone with similar access.
#How to See File Permissions
File permissions can be viewed using any terminal, GUI file manager, or an FTP program if the files are on your server. The command line is better in most cases, though, so that’s what we’ll cover in the section below.
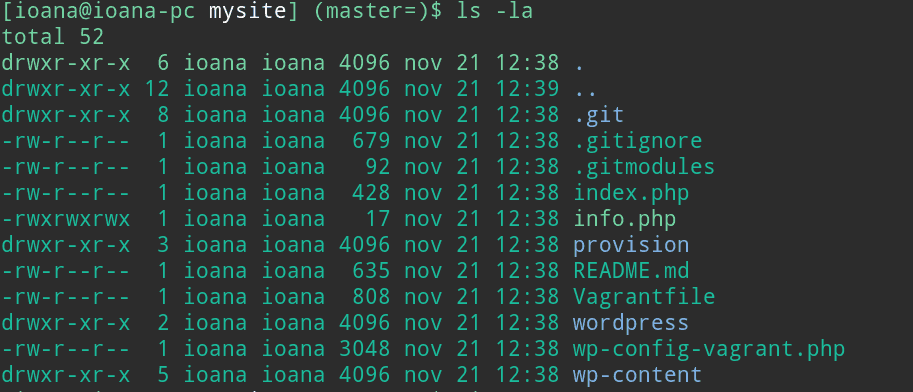
Open up your terminal and navigate to the directory where your file is located. Then type the following:
$ ls -la
This will list the contents of the current directory along with file permissions and access dates. It should look something like the following:
-rw-r–r– 1 root root 2227 2010-02-14 10:11 .viminfo
Recognize those first few characters? Those are the permissions for the file listed at the end of the line. We’ll break those down in the next section.
#Understanding File Permission Bits
The file permission shown above has ten spaces. Each of those can contain a file permission letter displaying something about the content in question. It’s important to remember that the location matters, not just the flag itself. Positioning is everything, and when read from left to right, it can tell you all you need to know about a file’s permissions at a glance.
The first position is easy. If there’s a ‘-‘ there, it means the content is a file. If there’s an ‘l’ (lowercase L), it’s a symbolic link (shortcut). If a ‘d’ is in the first position, it means you’re dealing with a directory.
The next three positions show what the owner can do to the file. So, for the example above, ‘rw-‘ means the owner can read and write to the file, but not execute it. If the owner could write and execute but not read, that would look like this:
-wx
The user group positions come next. The ‘r–‘ above means users can read but not write or execute. Finally, everyone else is granted permissions for the file. The example above has ‘r–‘, meaning everyone who isn’t the owner or a logged in user can only read the file, not write or execute it.
Still confused? Let’s separate out the permissions classes with brackets to make them easier to see. We’ll use the following as our core example:
drwxrwxrwx – A directory that allows read, write, and execute permissions for users, groups, and all others.
- [d] – The file type, which can be ‘d’ for a directory, ‘-’ for a file, or ‘l’ for a link
- [rwx] – The first grouping of three that sets permissions for an individual user.
- [rwx] – The second grouping of three that sets permissions for a group.
- [rwx] – The final grouping of three that sets permissions for other users.
#How to Modify Permissions
Now that you know what the permissions are and how they’re displayed, it’s time to learn how to modify them. Linux has a built-in command to do this, which we’ll discuss below. If you’re editing permissions on a remote server, you can often use your FTP program to change them, as well.
To modify the permissions of a file or folder you’ll want to use the chmod (change file mode) command along with a modifier and the target. The format will look something like this:
$ chmod <mode> <file>
You’ll replace the bracketed modifiers when you actually enter the command. For <mode>, you’ll add the appropriate symbols to change the permissions:
- r – the read flag
- w – the write flag
- x – the execute flag
- u – the user/owner permission flag
- g – the group permission flag
- o – the other users permission flag
To add a permission, set it with the ‘+’ symbol. To remove one, set it with a ‘-‘.
Putting this in practice, let’s say you want to change the permissions of a tile called “monkey” to lock everyone out of the file except for you. To do that from the command line, you’ll simply type the following:
$ chmod o-rwx monkey
After you hit enter, the chmod command will change the permissions for other users (“o”) by removing (“-“) read, write, and execute (“rwx”) permissions in one quick motion. The end result would be:
-rwxrwx–
If you want to add execute permissions to other users on the same file, you might use the following command:
$ chmod o+x monkey
This would alter permissions for other users by adding execute access. The resulting flags would be:
-rwxrwxrwx
#Changing Owners and Groups
There’s one other command you might find useful when dealing with Linux file permissions: ownership. These categories are crucial when it comes to controlling access to your content. By changing which group a user is a member of, you can instantly change their level of access, all without having to modify permissions.
The chown command changes ownership for a file. It works just like chmod with a few differences.
$ chown <owner> <file>
First, make sure you’re logged in with root access. To change the permission of a file from one owner to another one, use this:
$ chown nobody monkey
The user named ‘nobody’ is now considered an owner of the file ‘monkey’. You can change the group ‘nobody’ belongs to with the following command:
$ chown nobody:groupname monkey
Now ‘nobody’ is part of the ‘groupname’ group and will be affected by all permissions assigned to that group.
#What Are Special Permissions?
You now know the basics of checking, reading, changing, and understanding Linux file system permissions. As is usually the case with Linux information, though, there’s a lot more to grasp before you’re considered competent.
The first unusual category of permissions content is called special permissions. More specifically:
- s – the Set User ID (SUID) and Set Group ID (SGID) flags.
- t – the sticky flag.
These flags are set just like the flags above. So, if you wanted to give the user a SUID flag, you would enter this command:
$ chmod u+s monkey
Viewing the permissions of the monkey file would now reveal the following:
-rwsrwx–
See that ‘s’ in the middle there? It means the user has the SUID flag set and will inherit the access rights of its owner. In other words, everyone has RWX permissions, even though they aren’t listed as an owner. This is useful for times when everyone needs full access to a file but you don’t want to change the permissions.
The sticky flag changes how permissions are given when a file is created. When set to a directory, files created there can only be renamed or deleted by their owners. Set it via the terminal through the following command:
$ chmod +t /directory-name
#Representing Permissions with Numbers
Typing all of those permissions flags can be inconvenient, especially if you work with them on a regular basis. To get around this, programmers came up with a shorthand using numerical values.
R = 4
W = 2
X = 1
So, if you want to set a file to have read, write, and execute permissions for the owner but only read and execute permissions for everyone else, you could type out something like “-rwxr-xr-x”. Using numerical values, though, you can condense that down to a few numbers:
rwx = 4+2+1=7
rx = 4+1=5
So now you simply add those numbers to the terminal command:
$ chmod 755 monkey
When you view it with the ‘ls -la’ command, the permissions value for that file will now be defined as ‘-rwxr-xr-x’. And you didn’t have to type in a single letter!
The numbered permissions are far more common on FTP programs and web work. You’ll often see them referred to by numbers instead of letters since it saves so much more space. Learning to mentally translate these figures on the fly can take some getting used to, but you really will save a lot of time in the long run.
Below is a table of the symbolic notation of file permissions with its corresponding octal notation and plain English description.
- ———-… equals… 0000… which means… ‘no permissions’
- —x–x–x… equals… 0111… which means… ‘execute’
- –w–w–w-… equals… 0222… which means… ‘write’
- –wx-wx-wx… equals… 0333… which means… ‘write and execute’
- -r–r–r–… equals… 0444… which means… ‘read’
- -r-xr-xr-x… equals… 0555… which means… ‘read and execute’
- -rw-rw-rw-… equals… 0666… which means… ‘read and write’
- -rwxrwxrwx… equals… 0777… which means… ‘read, write, and execute’
#Conclusion
There’s a lot to learn about the world of Linux computing. Even just getting a grasp on the basics can be overwhelming, especially if you come from the age of smartphones and graphical user interfaces.
Underneath all the acronyms and abbreviations, however, Linux and its file system permissions are remarkably straightforward. Familiarizing yourself with the core concepts is a great place to start. Once you know the what and how of fundamental things, it’s easy to build on that knowledge. With a little practice, you’ll be chmodding remote directories with the best of them.

