

We’re back on our Presslabs blog with a series of short, on-point articles for our ‘How to’ series to help performance-oriented publishers with hints and tactics on how to get the most out of their WordPress experience.
Today we’re talking about Google’s simple mail transfer protocol (SMTP) Server. Although it’s not a widely publicized feature, Google, G Suite, and Google Apps e-mail offer a portable SMTP server that allows you to send mail from any network, for any e-mail address, free of charge. In this article, we’ll walk you step by step to make this feature work for you.
The Google SMTP server is a fantastic alternative to relying on your web host or ISP’s SMTP server for relaying e-mail. You can also embed the protocol in web applications to send e-mail directly from the internet, including on custom domains and your WordPress site. All you need is a Gmail account a few minutes to set everything up, then it’s time for free SMTP.

#Google’s Free SMTP Server – Basic Info
Small businesses, individuals, and companies that need to send out low volumes of e-mail often find themselves in a bind. Most paid SMTP services are geared towards larger companies–entities that send out thousands or hundreds of thousands of e-mails per month. Signing up for these means an unnecessary added cost, especially if you only need to send a few dozen e-mails per day.
Google and Gmail’s SMTP server is fast, reliable, and offers delivery of up to 100 e-mails every 24-hour period, all for free. This adds up to 3,000 e-mails per month, which is more than enough for most small businesses and individuals with basic e-mail communication and marketing needs.
#Google SMTP Requirements
This is the easy part. All you’ll need to take advantage of Google’s free SMTP server is a Gmail account (which is, conveniently, also free). If your business doesn’t already have one, simply create an address to get started. It doesn’t matter what the address is, as you can always change the settings to send outgoing communications using your custom business domain. We’ll detail on this topic below.
#What Google SMTP Can Do
A little bit of everything, to be honest. The SMTP service is designed as an entry-level option for anyone that needs SMTP access but can’t afford to pay a dedicated company. You can send personal e-mails, set the server up to use with contact forms, send bulk newsletters or marketing messages, and even quick notifications to your customers. As long as you don’t reach the daily limit, you’ve got a free SMTP service ready to go at all times.
Another overlooked benefit of Google’s SMTP server is that it doesn’t use port 25, which many ISPs often monitor and flag activity as spam. This functions as an added bit of insurance that your automated and bulk communications are actually going through.
#Limitations to Google SMTP
In addition to the 100 e-mails per 24-hour time period restriction, Google also rewrites the “From” line of all e-mails to reflect your Gmail address by default. This can negatively affect the presentation of your business communications, especially if you have a less-than-dignified Gmail address.
Fortunately, there is a workaround to the From rewrite issue, which we discuss in more detail below. For more information about Google’s limits on sending bulk e-mail, check out the company’s Bulk Sender Guidelines.
#SMTP Server Information
Google’s free SMTP server requires authentication before you can begin, a measure that prevents the service from being used as a spam hub. This simply means you’ll need to provide login and port information before you can start sending through Google SMTP.
It doesn’t matter which service you use with Google SMTP (Thunderbird, Outlook, WordPress etc.), the basic server details will remain the same. If you just need the raw details, we’ve provided all the information below. In the following sections, we’ll also cover some of the more advanced uses of the SMTP service, along with quick guides on setting things up on your own.
- Outgoing Mail (SMTP) Server: smtp.gmail.com
- Use Authentication: Yes
- Use Secure Connection: Yes (TLS or SSL depending on your client)
- Username: Your full Gmail address (you@gmail.com)
- Password: Your Gmail password
- Port: 465 or 587
#Send E-mail from WordPress Using Gmail SMTP
One of the most useful benefits of Google’s free SMTP service is the ability to set it up with your WordPress installation to send things like password recovery e-mails or contact forms. This bypasses the CMS’ clunky and unreliable default PHP mail function that often gets flagged as spam by e-mail clients.
There are multiple ways to get started with Google SMTP and WordPress, but the method we suggest is one of the fastest and easiest. Follow the instructions carefully, as there’s a lot to get done before it can be used.
The first thing you’ll need to do is install and activate the WP Mail SMTP plugin. This extension simply replaces the default WordPress PHP-sending script with more powerful services that are usually provided by third-party companies, including Google SMTP. You can search for this plugin directly from your WordPress dashboard or download it through the link above.

Next, visit the WP Mail SMTP settings page in WordPress to configure it for Google’s server access. Fill out the From Email field with your Gmail account address (not your business domain address), then add an appropriate From Name for your business.
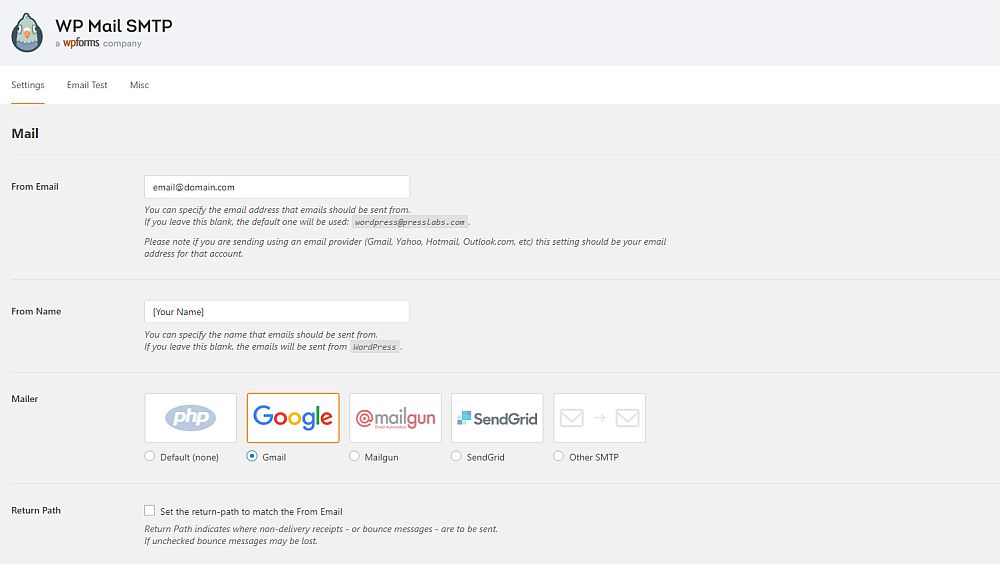
The WP Mail SMTP plugin offers two methods for connecting to Google SMTP—automatic and manual. One of them uses OAuth Authentication, which is more secure than the manual method. Unless you have to enter the details manually, simply enable the Google / Gmail option on the plugin’s setting page to continue.
Now you’ll need to create both app and API keys, and then insert them into the plugin’s interface to allow access to your Gmail features. In a separate browser window, go to the Google Developer Console and click the Create Project button. Give it a memorable name (“WP Mail SMTP” is perfect), then hit Create.
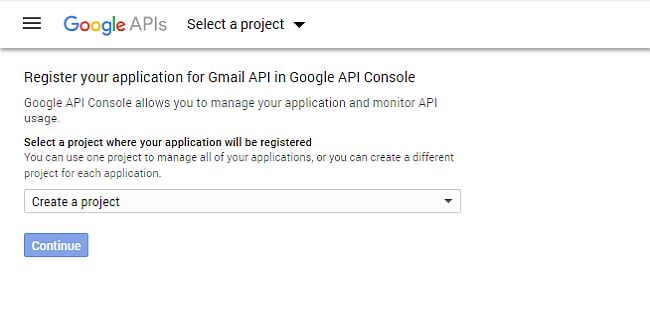
The developer console will generate your project and send you back to the dashboard. Now simply highlight the project and choose the Enable APIs and Services link. This will open a library page. Afterward, type in Gmail to filter in just the Gmail API, then enable it.
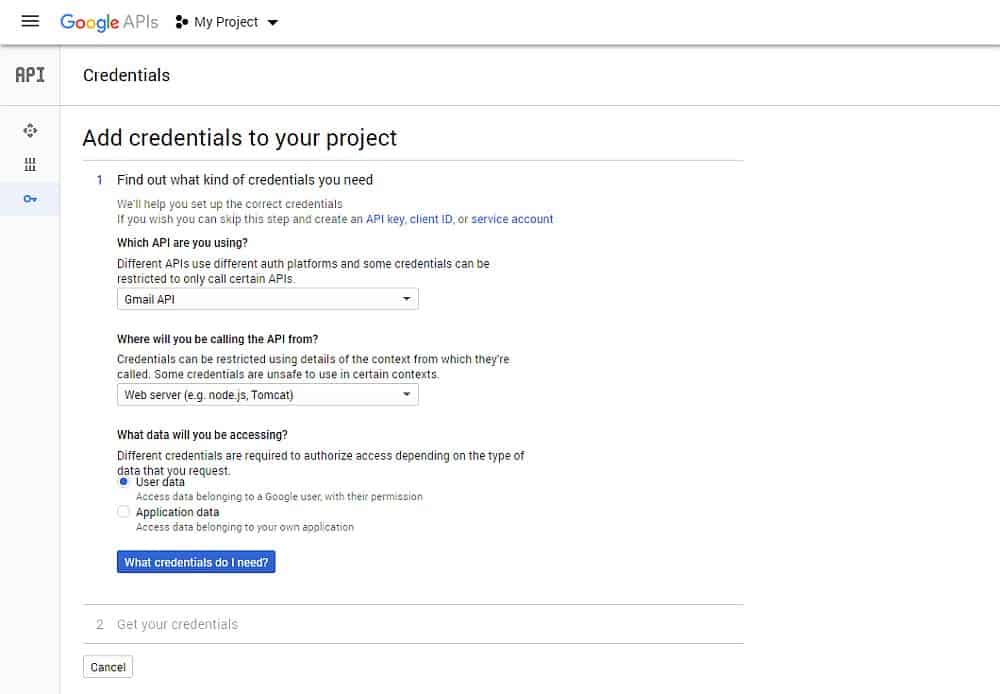
You’re finally ready to snag the credentials you need. Phew! Click the Create credentials button. Set the following options to the settings in bold, if they aren’t already filled in by default:
- Which API are you using? – Gmail API
- Where will you be calling the API from? – Web browser (JavaScript)
- What data will you be accessing? – User data
- Create an OAuth 2.0 client ID – WP Mail SMTP
- Restrictions – Enter your WordPress domain name
- Authorized redirect URIs – Copy/paste the URL from WP Mail SMTP
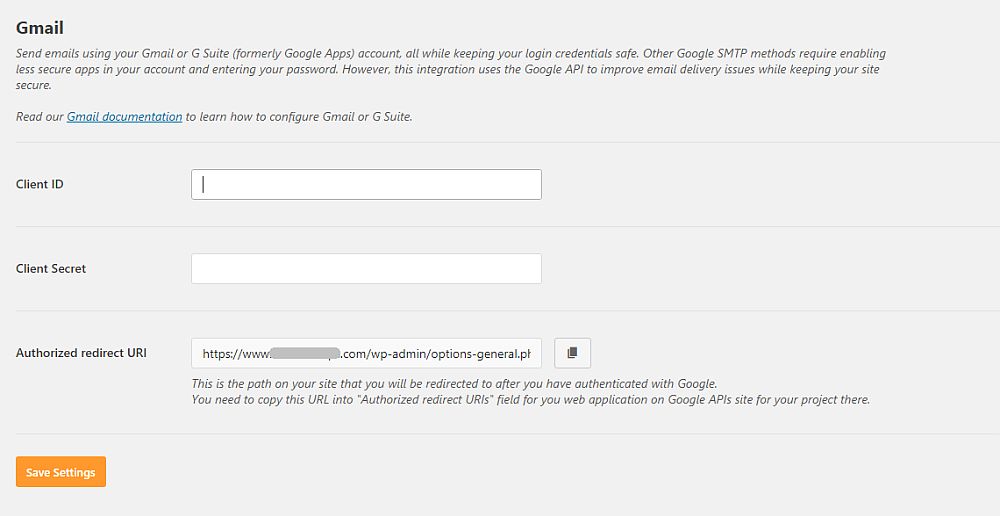
Once this info is in place, select Create client ID. You’ll see a consent screen where you just have to enter the WP Mail SMTP, then click Continue. Now you’ll see a Client ID displayed beneath Download credentials; copy this, switch back to your WordPress tab, then paste the Client ID into WP Mail SMTP’s settings page.
Next, we need to set up a client secret key. Go back to the Google dashboard, click Done to store the credentials you just created. Come back to the credentials page and look on the right side of the entry you just created, and there you just have to click on the edit pencil icon. The Client ID will show up at the top; copy it right away.
Go back to the WP Mail SMTP settings tab and enter the Client ID in the corresponding field. Save the settings and confirm the various security notifications to give the plugin permission to interact with Google. Now you should see a nice “Success” message once the process is complete. Congrats for getting here!
As a final step, you have to set up the plugin to actually send e-mails. Go back to WP Mail SMTP’s main page and select Other SMTP from the Mailer icons. Fill out the boxes with the following information, then save the changes:
- SMTP Host: smtp.gmail.com
- SMTP Port: 465
- Encryption: SSL
- Auto TLS: Off
- Authentication: On
- SMTP Username: Your full Gmail address (you@gmail.com)
- Password: Your Gmail password
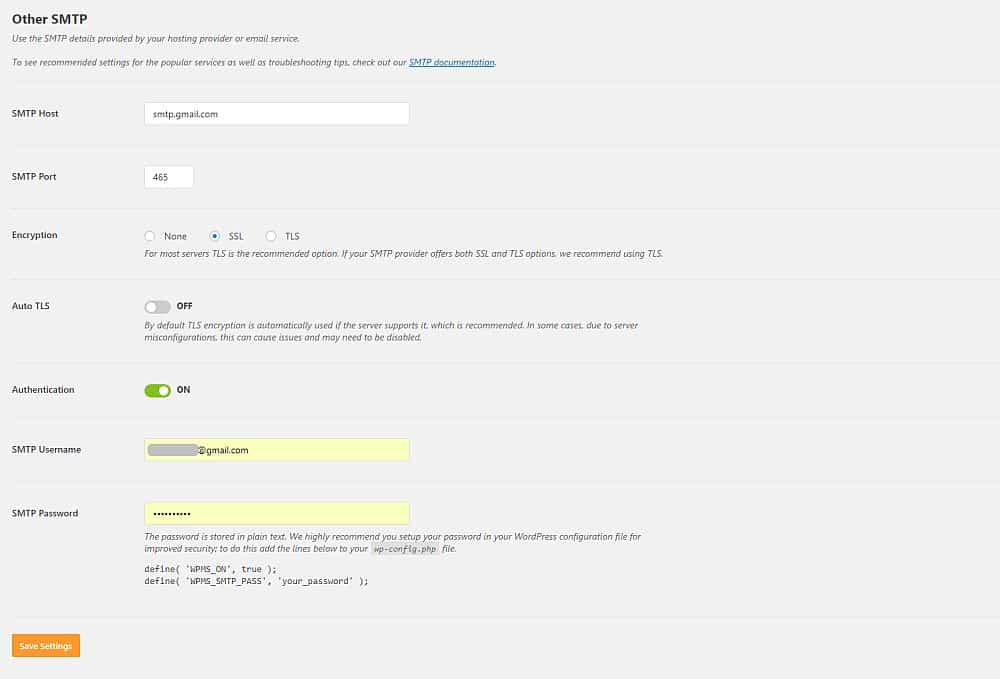
That’s it, you’re done! It’s worth taking a quick second to test and make sure the e-mail service works. Go back to Settings > WP Mail SMTP and click the Email Test tab at the top. Provide a Send To e-mail address (one that you can access, of course), then click the button at the bottom to run the test. If all goes well, you’ll see a confirmation from WP Mail SMTP and the e-mail will arrive in your inbox in a few moments!
#Sending SMTP E-mail with a Custom Domain
Want to use Gmail’s SMTP server but want to use your business account’s address? Don’t worry, Google has you covered! You don’t even have to sign up for Google Apps or the G Suite service to use it. With a little tweaking, you’ll be able to send communications through the free SMTP service as if you were running your own mail server.
The first step is to set all of your business accounts to forward to your Gmail account. This can be done through your hosting provider, or sometimes through your mail program (Outlook, Thunderbird).
Now that all of your e-mail is going to one location, sign into your Gmail account, click the Gear icon, go into Settings, then select Accounts and Import. Next to the “Send mail as:” section, click the Add another e-mail address you own link and enter your business name and e-mail on the next screen. Make sure the Treat as an alias box is checked, then go to the next step by clicking the button below.
In the next screen, change the SMTP server information to Google’s free SMTP (see above). Add your Gmail account information in the username and password fields, then click Add Account. Note that you may need to verify your Google password if you use two-factor authentication.
Repeat the above process for each of your business accounts. Now when you go to send or reply to an e-mail from Gmail, select the To field and you’ll see a dropdown list of all the e-mail addresses associated with your account. Pick the one you want your e-mail to appear to be from, then send away.
Note: if you want to use your business account for all e-mails by default, follow the workaround instructions below.
#Send E-mail from Any E-mail Client with Google SMTP
If you want to use a program like Thunderbird or Outlook with Google SMTP or your Gmail address, you can quickly set things up to keep all of your e-mail in sync. This works on desktop and mobile devices alike and should only take a minute or two to get running.
It doesn’t matter what e-mail program you want to use, all of them will offer some basic account adding fields that need the correct information. Some may fill in Google’s SMTP data automatically, but if they don’t, you can do it yourself.
Open your e-mail client of choice and add a new account. You should see a series of boxes asking for usernames, passwords, and ports. Here’s the information you’ll need to leverage Google’s SMTP servers. Make sure you have an active Gmail account before you begin, as you’ll need the login information here:
- SMTP Username: Your full Gmail address (you@gmail.com)
- SMTP Password: Your Gmail password
- Outgoing Mail (SMTP) Server: smtp.gmail.com
- Gmail SMTP Port (TLS): 587
- Gmail SMTP Port (SSL): 465
- SMTP TLS/SSL Required: Yes
Save this information to your client. You may need to re-enter your e-mail address and password before connecting for the first time. Once this is done, you should be able to both send and receive e-mails through Google’s SMTP servers, including forwarded e-mails from your business accounts.
#A Workaround for the Default Gmail “From” Rewrite
Google automatically rewrites the “From” field of any e-mail you send through its SMTP servers to the default address set up in your Gmail account, even if you don’t send the mail directly from Gmail. If you’re not careful, this can tarnish your business image. This small quick fix has to be done before you start sending e-mails to help you keep your branding consistent.
Start by signing into the Gmail account you use with Google SMTP. Click the gear icon in the top left corner, then choose Settings. Select the Accounts and Import tab. Look at the Send mail as section and make sure you have more than one e-mail address set up. If you don’t, add another account, preferably one personalized with your business branding. Now simply make this your default account; Google’s SMTP will automatically rewrite the From field using this address instead of your Gmail account. It’s that simple!
#Final Thoughts
Google’s SMTP server offers a fast, free, and surprisingly flexible option for individuals and small businesses to send out e-mail communications. With small adjustments, anyone can integrate the service into their WordPress installation, or simply use Gmail to send confirmations to customers, all at no cost.
Here at Presslabs we’re using it for sending transactional emails with two services: Sendgrid and Mailgun, as described in the always up-to-date version of our platform specifications page. The sent emails are not charged by us, but we rely on a fair usage policy respected by our WordPress hosting customers.

