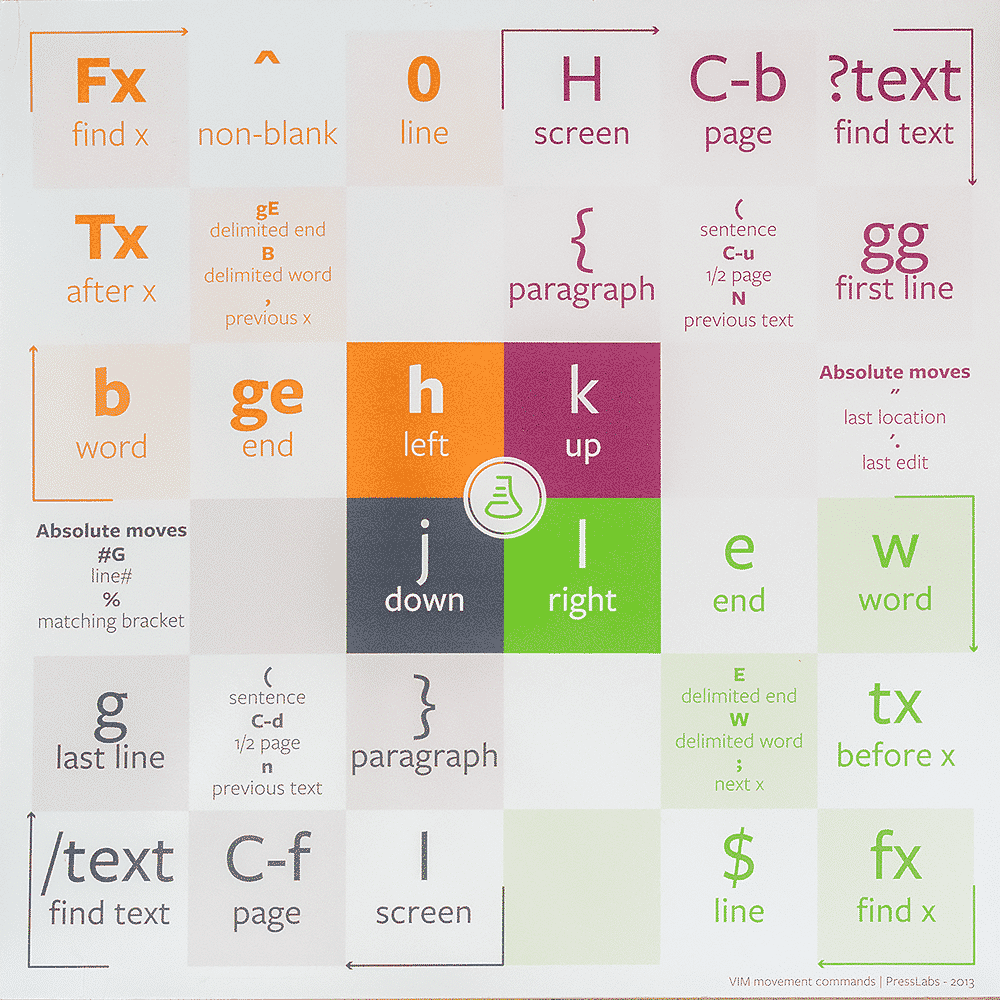
How to
Maintaining a successful website is no easy task. Aside from writing compelling content, distributing it on prolific channels and boosting its potential outreach, your site needs to deliver the best user experience, as fast as possible, so that you can both attract new visitors and keep the current ones coming back for more. There are a lot of technical issues that need to be taken into consideration, but there is one that stands out every time, that infamously succeeds in pushing away your visitors: slow load times.
There are a lot of factors which can impact your load times and a lot of optimizations you can implement to prevent that from happening. You can choose from a wide array of options: opt for a fast theme, install a caching plugin (we’ve developed our own caching mechanism to help you out), install clean plugins and keep them updated, optimize your database, delete old posts revisions and the list can go on and on. However, the first thing you need to take into consideration is optimizing your images. Images are greatly surpassing in size the plain text, but as the old saying goes, “a picture is worth a thousand words”, hence the visual-first trend across the web that needs a supporting solution.
Image optimization implies reducing the file size of your images as much as possible, without sacrificing quality, so that your page load times remains low. There are a lot of image optimization plugins out there, so we have chosen a few ones that do a great job at optimizing images and that are 100% compatible with our platform.
All the selected plugins contain the following basic features:
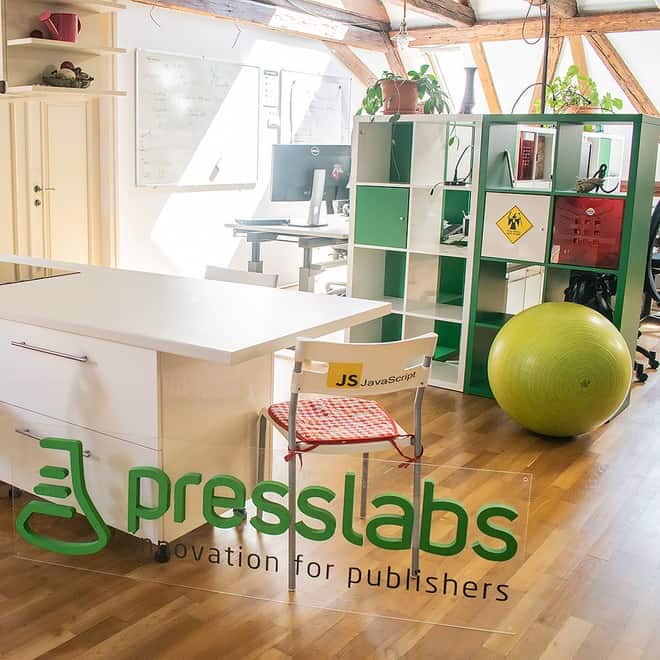
In order to test the plugins in terms of actual compression and quality of images, we have taken some photographs at our awesome Presslabs headquarters, using three JPEG images and one PNG image:
The tests were made using the plugins default settings and free plans.
ShortPixel not only scores well when it comes to compression, but it also has a nice interface. ShortPixel is entirely compatible with our platform, and their on point support team has helped us in solving any issues.
![]()
As the name implies, it’s easy to install—simply search it in the WordPress plugins, install it and activate it. Like most of plugins, it requires an API key. If you want to set up the ShortPixel plugin, you’ll be prompted to enter an API key during the activation process, which is provided for free by signing up with your email to their subscription list and doesn’t require any additional information.
ShortPixel comes with an intuitive, easy to use interface.
![]()
Each optimization option comes with a short description to help you in the process of choosing the best settings to optimize your images. By default, lossy compression is enabled, along with thumbnails optimization, image backups and the removal of EXIF tags. There is also a default image resize feature that will resize the images for you.
To bulk optimize your images, you can use the bulk optimization tool either directly from the ShortPixel Settings ( the “Save and Go to Bulk Process” button ) or from the Media library -> Bulk ShortPixel.
![]()
Here you can visualize details about the images to be optimized:
![]()
For each compressed image you can see the compression method used (lossy, lossless or glossy) and how much it was reduced. You can also compare the optimized image with the original one, you can re-optimize it with another image compression method or you can easily restore the original image.
![]()
You can also bulk optimize selected images by simply selecting the images you want to optimize or reoptimize from the Media Library, and then select the action you want to perform from the Bulk actions drop-down.
Shortpixel also offers statistics regarding average compression files and saved disk space, as well as details regarding your Shortpixel plan: number of images processed this month, remaining images in your plan, the total number of processed files, your backup folder size (which can be emptied if you wish so).
![]()
![]()
Quality comparison:


This plugin is updated on a regular basis & has 90K+ active installs with a 4.5-star rating.
The free account allows you to reduce the sizes of 100 images and thumbnails per month. If you need more image optimization credits, you can purchase monthly and one-time plans according to your needs, as well as earn extra credits from referring new users to the service.
If you exhaust your free image credits, ShortPixel will stop optimizing. You can either wait for the next month’s quota when your plan will renew, or change your plan.
ShortPixel comes with 100 free credits/month and additional credits can be bought with as little as $4.99 for 5,000 image credits. They offer monthly pricing plans, one-time plans and also the possibility of dedicated servers. The monthly plans start with as little as $4.99 for 5,000 images and the one-time plans with $9.99 for 10,000 images. The latter is a great choice if you wish to bulk optimize the images you have in your database. With each purchase, the one-time plans will add up to your quota.
Imagify offers you a well designed and easy to use interface, while also taking good care of your images.
It’s really easy to install, just simply search it in the WordPress plugins, install and activate it. A message showing you the steps for configuring your account pops up immediately in the plugins section.

In the Settings section -> Imagify you can simply request an API key by providing your email address. You will receive an email containing both your API key and Imagify account credential shortly.

You need to enter your API key where specified, and your account is now all set up.
Imagify comes with a nice interface, allowing you to configure the settings for each optimization level: normal, aggressive or ultra. The normal level uses a lossless compression, whereas the aggressive and ultra ones use the lossy compression. Each option is accompanied by a short description to help you decide if you need the setting or not. The general settings allow you to set auto-optimize images on load, backup original images and keep EXIf data.

The optimization settings allow you to set a maximum pixel’s width and select the thumbnail dimensions to be optimized, as well as select custom folders for optimization.

You can easily spot your account type, which in this case is the free one. One great feature offered by Imagify is calculating what kind of plan you need, correlating with the total number of original images that have been optimized.

You can use the Bulk Optimization to optimize all the images on your site from Media -> Bulk optimization. The images will be optimized using the last compression method you saved from the Imagify settings page, which is by default the aggressive one, which offers the best compression while also keeping an unnoticeable photo quality.

You can also optimize images individually from the Media Library. After an image is optimized, you can see details about the level of optimization, overall saving, the old and new file sizes, as well as the number of optimized thumbnails. You also have the possibility to reoptimize each image using another level of compression or restore the original image.

From the bulk action drop-down, you can bulk restore images to their originals, as well as restore individual images. You also have the possibility to compare the optimized version with the original one:

Imagify offers only the basic features presented at the begging of the article, grouped in three levels of optimization: normal (lossless), aggressive (lossy) and ultra (lossy). These settings are more than enough for basic optimization needs.
The photos optimized with the aggressive level:

Quality comparison:


The photos optimized with the ultra level:

Quality comparison:


This plugin is updated on a regular basis & has 100K+ active installs with a 4.5-star rating.
The free account allows you to optimize for free 25MB of images (about 250 images) every month and you will receive a 25MB bonus upon registration. Also, on the free account, you cannot optimize images greater than 2 MB. With a free account, once your quota is reached, you cannot optimize new images before renewal. With a paid account, you will be charged according to additional GB pricing of your subscription.
Imagify offers free accounts, where you can optimize for free 25MB of images every month and you will receive a 25MB bonus upon registration. It includes monthly plans starting at $4.99 for 1GB of data per month, which they approximate covers for 10 000 images. Imagify also offers one time plans, starting at $5.99 for 500MB of data (approx. 5000 images).
For security reasons, the Ewww Image Optimizer is banned on our platform, since it requires the exec function, which is blocked by us. We recommend using the EWWW Image Optimizer Cloud, which offers a cloud optimization feature, instead of the optimization process taking place within your own servers.
To install EWWW Image Optimizer Cloud, search it in the WordPress plugins section, install and activate it. Like most other plugins, it requires an API key. Here it gets a little trickier since the Cloud version of EWWW Image Optimizer does not offer a free account possibility. They charge based on how many images you’re processing per month (thumbnails included), with a small fee for the chosen plan. By subscribing to the Meteor Monthly plan, the fee you have to pay is $0.99 and you get 500 free credits upon registration, this means you can optimize for $0.99 500 images or thumbnails, afterward you will be charged with $0.003/ image.

Upon registration, you will receive an email with your API key, that you need to enter it in the Settings section of the plugin.

Ewww Image Optimizer Cloud offers more complex settings, which results in a more intricated interface. This can seem overwhelming to a user who merely needs basic image optimizations, but you can use the default settings for basic optimization needs. The lossless method is enabled by default, so be aware of changing it to the lossy one if you need better optimization. Also, the default settings do not include any resing option regarding larger images.


To bulk optimize your images, go to Media -> Bulk Optimize.

On the right corner are displayed the image credits you have left. If you surpass your credits, you will be charged with $0.003 / image. You can visualize the optimized images or scan for unoptimized images, which will tell you how many images will be optimized, and you can start optimizing them.

You can stop the process, resume it or reset it at any time during the optimization. You can also optimize your images individually from the Media Library. For this purpose, you have an “Optimize now” button for each image that has not been optimized and the possibility to restore the original image for each optimized image. Keep in mind that EWWW Image Optimizer Cloud only keeps the original images for 30 days, so after this period, you won’t be able to restore your images anymore.

You can also reoptimize your images, if for example you change your optimization settings, or visualize details of the optimized images and thumbnails.


The default Ewww Image Optimizer Cloud setting for PNG images is set to a lossless compression. This is the reason the PNG images was reduced by only 4.1%. Changing the PNG compression to lossy, the png image is reduced with 59.1%, which is a far better compression.
Quality comparison:


This plugin is updated on a regular basis & has 6K+ active installs with a 4-star rating.
Ewww Image Optimizer Cloud does not provide a free account, you need to sign up for a plan to test it.
Ewww Image Optimizer Cloud charges per image you optimize, thumbnails included. They have a start fee, that for the monthly plan, for example, is $0.99, and $0.003 for every image you compress. Upon registration, you receive 500 free credits (images to compress).
Do you feel confused about all the features and settings presented above? Optimole is a “hassle free” image optimization plugin, which handles resizing, compressing and serving your images via CDN on the fly, as soon as you activate it and without further configuration.
Optimole is easy to install—simply search it in the WordPress plugins, install and activate it. It required an API key which you will get as soon as you register your email address.

Then introduce the API key and you are all set, their “moles” will automatically start taking care of your images.

Optimole looks like a truly install-and-forget-about-it plugin. After installing it and configuring your API key, it automatically starts taking care of your images. Just sit back and focus on publishing, while their “moles” do all the magic behind.

How does Optimole work? Most image optimization plugins optimize and replace the images in the Media Library, while keeping backups of the original images for a certain amount of time. Optimole brings a totally different approach: it uses the Amazon’s Cloudfront CDN to optimize and serve your images. Simply put, the images you upload remain in the media library at their original size, but when a user accesses an image, it will be optimized and served through their CDN. This means that if you just upload an image and not use it anywhere on your site, it won’t be processed nor used by the service.
Optimole has an easy to use settings menu, which also shows you an example of how much they reduce your images’ sizes, while also keeping their quality. You can select basic features like the compression level and maximum image resolution, as well as some cool custom features, such as image replacement and javascript replacement.

With Optimole, images are optimized and served via CDN on the fly, as soon as a user accesses them. The images are processed for best results with both lossless and lossy optimization and are automatically resized for any device, so their sizes depend on many factors. For these tests, the images have been inserted in a blog post and their size has been checked in a desktop browser. Also, these “Reduced by” percentages are calculated per image, whereas the percentages calculated by the other plugins also include image thumbnails.
| Image | Original size | Compressed size | Reduced by |
|---|---|---|---|
| test1.png | 1.5 MB | 593,7 KB | 60,4% |
| test2.jpg | 876,3 KB | 116,7 KB | 86,7% |
| test3.jpg | 908,1 KB | 126,1 KB | 86,1% |
| test4.jpg | 954,2 KB | 151 KB | 84,2% |
Quality comparison:


Optimole is a newcomer in the image optimization world, but has already 3K+ active installs and it is regularly maintained.
The free plan allows you to optimize 1GB of images per month and 10GB of viewing bandwidth. Il also serves the images from the default CDN, from 7 locations around the world, while on the paid plans they have Amazon Cloudfront CDN, with more than 130 locations around the globe.
Optimole includes most of the features the other plugins have and more, but the image compression is handled automatically and there is little room for customized settings.
Besides the free plan which includes 1GB of images per month, Optimole has 2 monthly paid plans: Premium – 9.99€ and 10 GB of images per month and Enterprise – from 100€ and 750 GB of images per month.
From the quality point of view, all plugins do a great job and you cannot tell the difference between the original and the optimized versions.
In terms of compression, ShortPixel does a great job, reducing the images with more than 80%, thumbnails included. Imagify and Ewww Image Optimizer Cloud do a good job too, reducing the images with 60-70%. Optimole comes with a new approach – serving images through Amazon’s CDN, which results in images reduced by more than 80%.
Shortpixel and Imagify keep backups until you delete them, Ewww Image Optimizer Cloud only keeps backups for 30 days. Optimole does not replace the images in your database.
Rather than charging by the number of images like ShortPixel and Ewww Image Optimizer Cloud, Imagify and Optimole charge by the aggregate file size of all the files you optimize.
The first three plugins offer the same features for both free and paid plans, they only differ in the number of images you can optimize. Optimole adds up special features in their paid plans, such as Cloudfront CDN served from 130+ locations instead of their default CDN, custom CNAME and priority support.