How to use the DNS manager with various record types
Managing DNS records seems confusing for most users, especially since changing them affects how a website gets accessed. We have put together some practical examples to help our customers better understand how to use them on the Managed Hosting Dashboard.
Overview
You can easily add all the DNS records you wish in the DNS editor .
NOTE
Only the site owners can manage the DNS zones.
The DNS records are added for a certain DNS zone, so make sure you select the right DNS zone. The newly added DNS records may take up to 48 hours to take effect, depending on how often the Internet Service Providers are refreshing the information. For most ISPs, the DNS changes are visible in a few hours, if not minutes.
To add a record for the root domain use @ and when adding a subdomain you only need to enter the subdomain (e.g. blog), without the whole main domain (e.g. blog.example.com).
A-records
An A record maps a domain directly to its corresponding IP address.
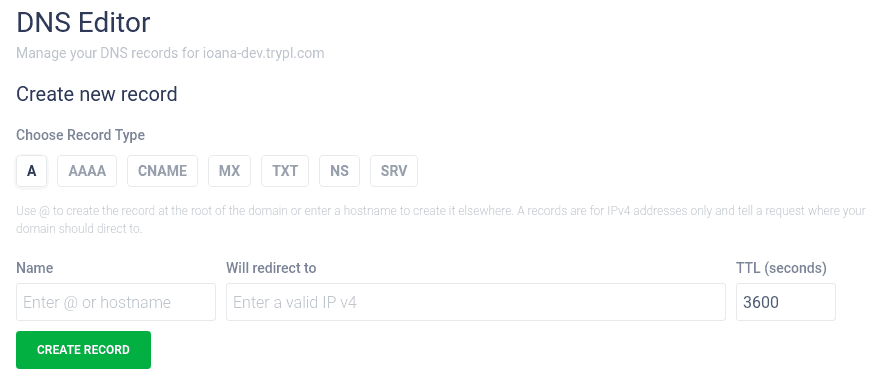
The necessary A records needed for your site to run on Presslabs (root domain, www and CDN sub-domains) are managed by us, since we handle requests with our own
geographically distributed delivery network
.
However, you may need to add A records when you configure your email for example.
CNAME
A CNAME is a record that points to another domain address rather than an IP address. It’s used when you want to point a subdomain to a certain domain.
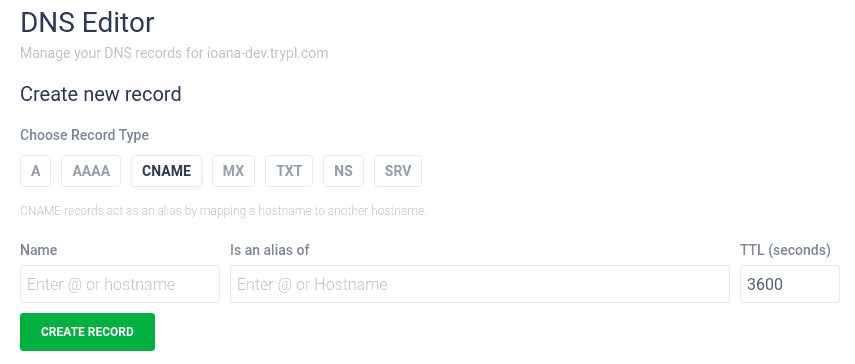
A practical example would be if you want to set up an email with your own domain, while you are using a mail provider such as Google or Sendgrid. In this case you usually have a mail subdomain (mail.mysite.com) that needs to point to that email service:
| Name | Is an alias of | TTL(seconds) |
|---|---|---|
ghs.googlehosted.com. |
3600 |
| Name | Is an alias of | TTL(seconds) |
|---|---|---|
sendgrid.net. |
3600 |
Or maybe you have your own email service that you want to point to your site’s IP address. Then you set up a CNAME to your site’s domain:
| Name | Is an alias of | TTL(seconds) |
|---|---|---|
mysite.com |
3600 |
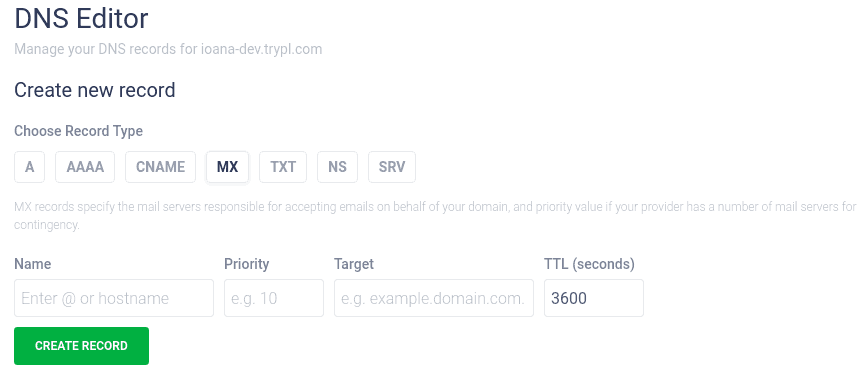
MX
MX records are necessary to send and receive e-mails. The record specifies towards which servers to deliver the mails. They also come with a priority indicator to help direct content through the fastest and most efficient servers.
NOTE
We offer the possibility to quickly set up the appropriate
MXrecords for Google or Zoho with a simple click from our Managed Hosting Dashboard . You simply choose your mail provider and we set up the appropriateMXrecords.
For any other email solution, you’ll have to setup custom MX records for your emails to point to their servers. They will provide you with the specific instructions.
If you want to keep your old mail host, a solution would be to add an A-record for mail.mysite.com to the IP of your old mail host.
| Name | Will redirect to | TTL(seconds) |
|---|---|---|
IP address of the email service |
3600 |
Then an MX record is added to mail.mysite.com:
| Name | Priority | Target | TTL(seconds) |
|---|---|---|---|
| @ | 1 | mail.mysite.com |
3600 |
TXT
TXT records contain text information for sources outside your domain. You can use TXT records for various purposes, the most common ones being verifying domain ownership and ensuring email security.
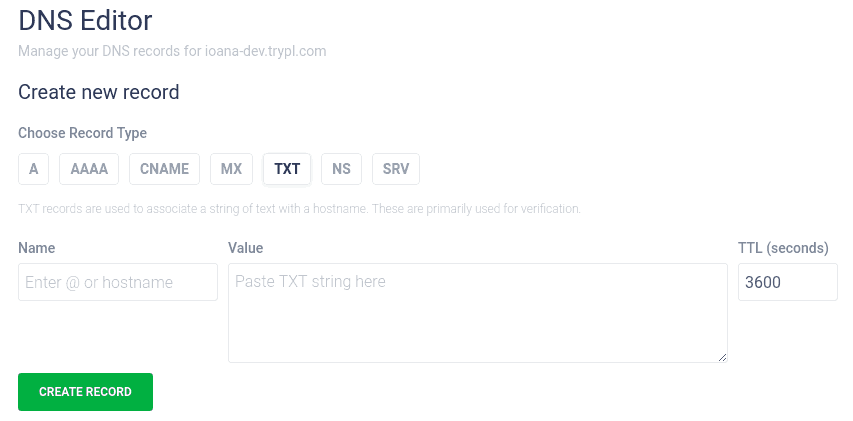
Verify domain ownership
For example, some webmaster tools like Google will ask you to add a TXT record to your domain to prove you are that domain’s real owner, displayed such as:
| Name | Value | TTL(seconds) |
|---|---|---|
| @ | google-site-verification= rXOxyZounnZasA8Z7oaD3c14Jdj... |
3600 |
You can also add TXT records to verify subdomains:
| Name | Value | TTL(seconds) |
|---|---|---|
| blog | google-site-verification= rXOxyZounnZasA8Z7oaD3c14Jdj... |
3600 |
Email security
In terms of email security, TXT records are commonly used for setting up the following records:
- Sender Policy Framework (SPF) - verifies that a mail server is authorized to send email for a domain
- DomainKeys Identified Mail (DKIM) - adds a digital signature to make sure the messages weren’t altered in the transit
- Domain-based Message Authentication, Reporting and Conformance (DMARC) - lets you decide what happens with the emails that fail SPF and DKIM, instead of leaving it up to you ISP
SPF
SPF is a security mechanism created to prevent others from sending emails on your behalf. The general idea is to make sure all applications that send emails on your behalf (Google, MailChimp etc.) are included in your SPF, for examples here’s
Google’s instructions
on how to do this.
Your mail provider will guide you in setting up these records. For example, if you are using Google Apps to send all emails from your domain, you should add the following TXT record:
| Name | Value | TTL(seconds) |
|---|---|---|
| @ | v=spf1 include:_spf.google.com ~all |
3600 |
Multiple SPF records are not recommended and will cause authorization problems. So if you’re using more apps/ services for emails (for your newsletter, support messages, etc.), you will have to update the existing SPF record with multiple mail servers.
| Name | Value | TTL(seconds) |
|---|---|---|
| @ | v=spf1 include:serverdomain.com include:_spf.google.com ~all |
3600 |
DKIM
DKIM requires the addition of public keys into your DNS zone. The key is often provided to you by the organization that is sending your email, for example Google Apps, SendGrid etc. The key will be inserted directly into your zone as a TXT record.
It’s easy to impersonate a trusted sender over SMTP. This led to spam for end users that appeared to come from legitimate sources. Spoofing email from trusted domains is a popular technique for malicious spam and phishing campaigns, and DKIM makes it harder to spoof email from domains that use it.
If you are given a string representing the DKIM, it will usually look something like this:
v=DKIM1; k=rsa; p=MIIBIjANBgkqhkiG9w0BAQEFAAOCAQ8AMIIBCgKCAQEAraC3pqvqTkAfXhUn7Kn3JUNMwDkZ65ftwXH58anno/bElnTDAd/idk8kWpslrQIMsvVKAe+mvmBEnpXzJL+0LgTNVTQctUujyilWvcONRd/z37I34y6WUIbFn4ytkzkdoVmeTt32f5LxegfYP4P/w7QGN1mOcnE2Qd5SKIZv3Ia1
Your provider will also give you a specific subdomain to use, usually something like dk._domainkey.
| Name | Value | TTL(seconds) |
|---|---|---|
| dk._domainkey | v=DKIM1; k=rsa; p=MIIBIjANBgkqhkiG9w0BAQEFAAOCAQ8AMIIBCgKC... |
3600 |
NOTE
Note that if your provider sends you a fully-qualified name that ends with your domain name, you should NOT include your domain name in the Name field when you add the TXT record. For example, if you receive
dk._domainkey.yourdomain.comthen you will only enterdk._domainkeyin the Name field.
DMARC
In order to get started with DMARC, the sending domain needs to have an SPF and DKIM record published. Once the SPF and DKIM records are in place, you can configure DMARC by adding policies to your domain’s TXT records.
| Name | Value | TTL(seconds) |
|---|---|---|
| _dmarc | v=DMARC1; p=none |
3600 |
| Name | Value | TTL(seconds) |
|---|---|---|
| _dmarc | v=DMARC1; p=quarantine; pct=100; rua=mailto:dmarc.rua@customddomain.com |
3600 |
SRV
SRV records are used to establish connections between a service and a hostname, usually used for advanced email settings.
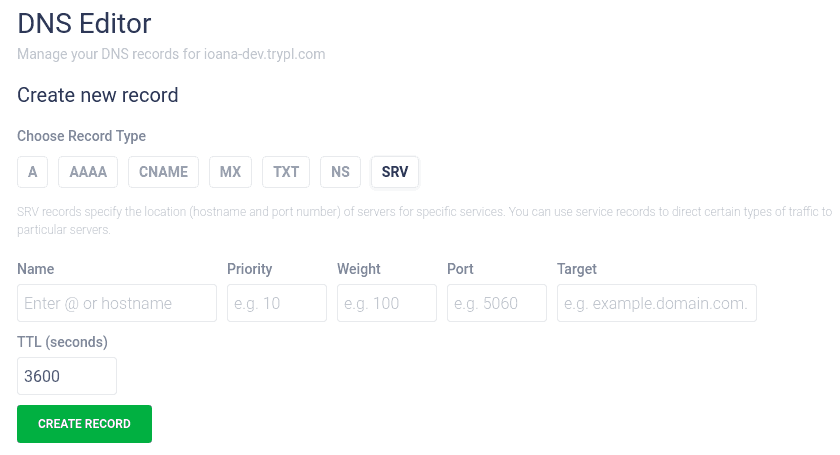
Here is an example of SRV record required to set up Office 365:
| Name | Priority | Weight | Port | Target | TTL(seconds) |
|---|---|---|---|---|---|
| _sip._tls | 100 | 1 | 443 | sipdir.online.lync.com |
3600 |
In the example above, _sip indicates the type of service and _tls indicates the protocol. The target is the name of the host that provides the service, in this case Office 365.
The priority establishes which services should be looked at first. The lower the number value, the sooner the SRV record will look at it.
The weight is used if two or more services have the same priority, to determine which line should come first. The higher the number, the sooner the SRV record will look at it.
CAA
A Certificate Authority Authorization (CAA) record is typically used to indicate which Certificate Authorities (CAs) are authorized to issue certificates for a domain. In our case, CAA records allows domain owners to declare which CAs are allowed to issue a certificate for a domain.

A simple CAA record which allows Let’s Encrypt to issue for the main domain might look like this:
| Name | Value | TTL(seconds) |
|---|---|---|
| @ | 0 issue "letsencrypt.org" |
300 |
To add a record for the root domain use @ and when adding a subdomain you only need to enter the subdomain (e.g. blog), without the whole main domain (e.g. blog.yourdomain.com).